The Hamilton CapTel 2400i and 840i captioned telephones showing sample captioned conversations

Numbers 1, 2, and 3 inside colored circles Setting up your captioned phone is as easy as 1-2-3

Thank you for choosing Hamilton® CapTel® captioned telephone to connect with what matters most in your life. Below is a quick walkthrough on how to set up your new phone.

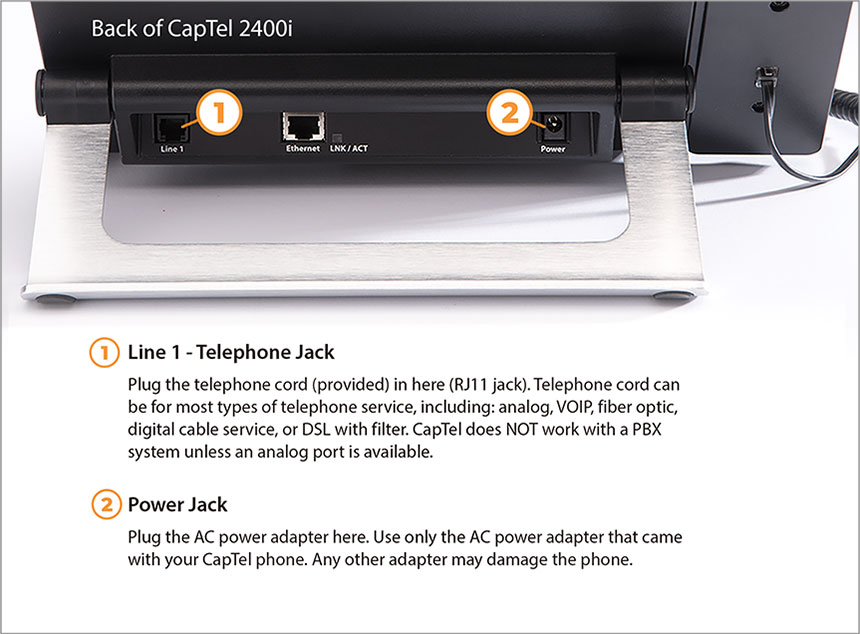
For the Hamilton CapTel 2400i

Step 1. Connect the telephone and power cords

Plug in the telephone cord and AC power adapter as indicated below.

Close up of back side of 2400i captioned telephone showing power and phone connections

Line 1 telephone jack : plug the telephone cord (provided) into the RJ11 jack. Telephone cord can be for most types of telephone service, including: analog, VOIP, fiber optic, digital cable service, or DSL with filter. CapTel does NOT work with a PBX system unless an analog port is available.

Power Jack: plug the AC power adapter into the power jack. Use only the AC power adapter that came with your CapTel phone. Any other adapter may damage the phone.

Step 2. Connect to the internet

Connect directly with an Ethernet cable or via WiFi using your wireless network.

Close up of back side of 2400i captioned telephone showing ethernet jack and internet connectivity indicator light

Ethernet jack : plug the ethernet cable (provided) into the ethernet jack to connect to your internet service. If you connect to the internet using a WiFi network, you do not need to plug in the ethernet cable.

LNK/ACT status light : lets you know if your ethernet cable is connected to the internet and whether activity is on the line. NOTE: the LNK/ACT indicator does not light up when you use WiFi to connect to the internet.

Step 3. Follow the on-screen instructions

Walk through the one-time registration process and experience the benefits of captions on your calls.

If you’d like a more detailed description of all the features of your new captioned phone, download the Hamilton CapTel 2400i Set-up Guide.


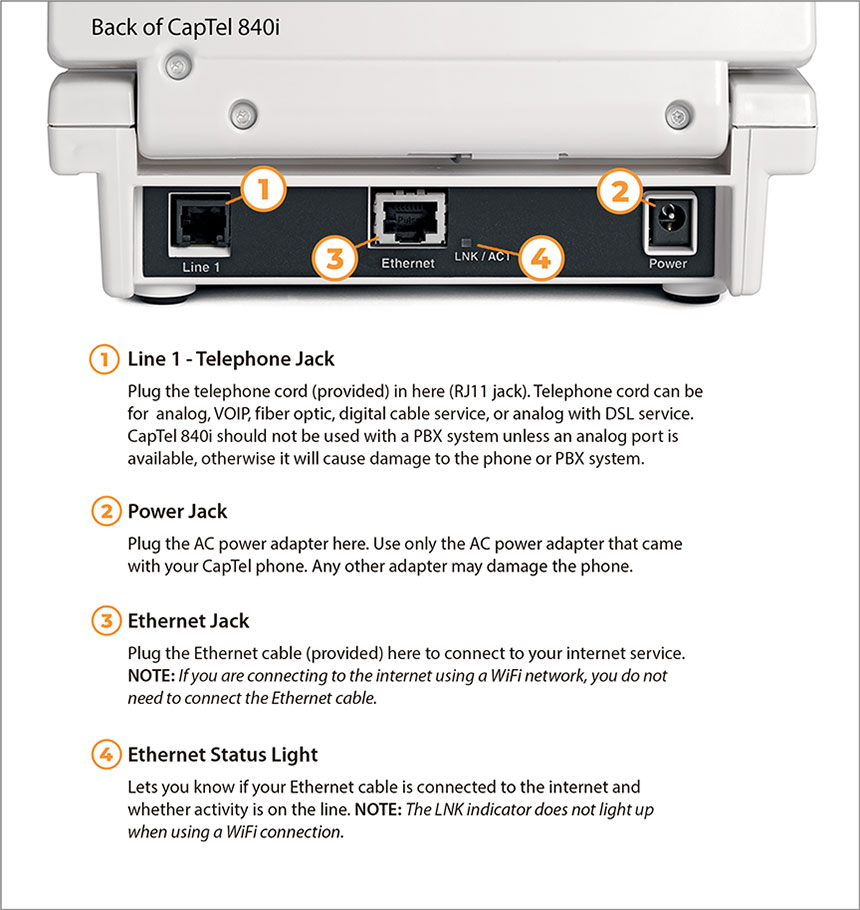
For the Hamilton CapTel 840i

Step 1. Connect the telephone and power cords

Plug in the telephone cord and AC power adapter as indicated below.

Close up of back side of 840i captioned telephone showing power and phone connections

Line 1 telephone jack : plug the telephone cord (provided) into the RJ11 jack. Telephone cord can be for most types of telephone service, including: analog, VOIP, fiber optic, digital cable service, or DSL with filter. CapTel does NOT work with a PBX system unless an analog port is available.

Power Jack: plug the AC power adapter into the power jack. Use only the AC power adapter that came with your CapTel phone. Any other adapter may damage the phone.

Step 2. Connect to the internet

Connect directly with an Ethernet cable or via WiFi using your wireless network.

Ethernet jack : plug the ethernet cable (provided) into the ethernet jack to connect to your internet service. If you connect to the internet using a WiFi network, you do not need to plug in the ethernet cable.

LNK/ACT status light : lets you know if your ethernet cable is connected to the internet and whether activity is on the line. NOTE: the LNK/ACT indicator does not light up when you use WiFi to connect to the internet.

Step 3. Follow the on-screen instructions

Walk through the one-time registration process and experience the benefits of captions on your calls.

If you’d like a more detailed description of all the features of your new captioned phone, download the Hamilton CapTel 840i Setup Guide.

If you need further assistance, we’re here for you 24/7/365 – choose the contact option that works best for you: